

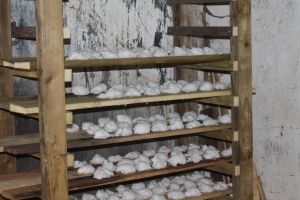
Kiln fully packed with greenware ready for a bisque firing
All my work is fired in either the electric kiln pictured here or my wood-fired kiln (see description and firing details below).
The electric kiln is a Potclays Silver S65 with approximately 6.5 cubic feet capacity.
In this kiln each item (other than plant pots) is fired twice; a bisque firing to 1050C and and a glaze firing to 1240C. The bisque firing is to a slightly higher temperature than most potters use. This allows me to make plant pots which are frost resistant in the bisque firing.
I pack the biscuit firing densely with only a single shelf and as many as 200 items. Nevertheless, firing (in terms of wear and tear on the elements) is the single most costly element in the production of the majority of items. The firing schedule comprises 80C/hour up to 200C then 120C/hour to 1050C followed by a 15 minute soak at 1050C.
Bungs are put in at top temperature allowing a maximum of oxidation as the temperature rises to remove any organic matter in the clay.

Kiln almost fully packed. Just one more semicircular shelf to go in supported by the three props on the right
My kiln is the minimum specification model with a single power regulator and is prone to uneven firing at stoneware temperatures….. the top and bottom shelves firing much cooler than the internal shelves.
To partially rectify this problem I pack the kiln in a slightly non-standard way. The circular, full kiln (-2 inch) diameter shelves supplied with the kiln act as barriers to heat movement within the kiln and combined with the heat escaping through the floor and lid are the cause of the low temperatures at top and bottom. I therefore only use 2 of these very close to the middle of the kiln just either side of the thermocouple. The lower one supports a selection of flatware. This arrangement leaves me with two tall ware chambers one below these two shelves and one above. These two tall chambers are packed using semi-circular shelves from my now defunct, much smaller diameter previous kiln. The semi-circular shelves are offset relative to one another and are set at different heights on either side of the kiln. This allows for heat movement throughout the ware chambers and results in much more even temperature firings.

Kiln fully packed. I just need to glaze those three espresso cups on the top right shelf.
The firing schedule for glost firings is as follows. 80C/h to 90C, 40C/h to 110C This slow section is to allow water which may still be in the pots to evaporate as I frequently glaze, pack and fire on the same day. 150C/h to 900C, 120C/h to 1000C, 100C/h to 1140 and 90C/h to 1240C. At around 1220C I put in all the bungs. Finally I soak at 1240C for a variable period depending on the age of the kiln elements. This may seem overly complicated but it allows me to squeeze a dozen more firings out of a set of elements. As they age they can’t maintain the same rate of temperature rise. The schedule mimics the performance old elements can manage. The soak period is changed as the elements age such that the time it takes to get from 1200C to the end of the soak period is always 45 minutes. The kiln is allowed to cool without intervention.
Most glaze firings contain approximately 100 items.

Apart from the chimney stack the kiln is built inside a partially dismantled stable to keep it dry.
The wood-fired kiln I built myself (see blog posts starting in June 2015). Technically speaking its a modified Olsen fast-fire down draft with 2 opposed fireboxes and a ware chamber of approximately 0.8 cubic metres – just over 4 times the size of the electric kiln. I fire it with reclaimed scrap wood such as old sheds and garages and pallets which are damaged or not economically re-usable.
A lot of work is required to pull the sheds or pallets to pieces, remove (most of) the nails and cut the lengths of wood to fit in the fireboxes – which are just over 1 metre long. However this is probably no more work than felling trees and splitting them down to usable sized pieces and requires much less specialised and expensive equipment. The wood then needs to be stored, under covers or indoors, for several months to make sure it is nice and dry.
In general pots are only fired once in this kiln. I may bisque fire them first in the electric kiln if they are delicate or awkward to handle during the glazing/decoration stage….. Bisque fired pottery is much more robust than un-fired clay especially if it is being dipped in glaze or slip. A few pots may be fired a second time if they haven’t developed enough fire induced character the first time round.
Firing is done in two stages. The first day involves a very gentle heating of the kiln to no more than 120C which is maintained for half a day. This requires very little of my time and not much wood and serves to thoroughly dry out both the kiln structure and the pots within. I let the fires go out overnight. The second day is intense and long ( 9-12h) but I can manage it by myself which avoids having to co-ordinate available helpers and the weather. I only fire on days when the wind is blowing away from our house and the rest of the village as I don’t want to become a social pariah.
Spoonfuls of salt are placed on planks ready to be placed in the kiln firebox during the firing.
The main firing schedule is complicated by the fact that I use salt to glaze the pottery. This is a technique developed in Europe during the 1400’s and relies on the fact that common household salt (sodium chloride) reacts with sand (silica) and clay at high temperatures to produce a glassy surface on the pottery.
I raise the temperature up to approximately 1150C in about 4 hours then start adding the salt. The salt is added by putting planks holding spoonfuls of damp salt into the fireboxes together with additional wood to keep the temperature above 1150C. The salt vaporises, is carried into the ware chamber with the hot air where some of it reacts with the pots and then goes up the chimney as a very fine mist. I use between 6 and 7.5 Kg of salt per firing and check how things are going by taking little test pieces out of the kiln. It takes around 2 hours to add the salt. I then bring the temperature up to the target of ~1250C by stoking every 3 or 4 minutes for an hour. The final stage of the firing is an oxidised cooling. This is achieved by opening the chimney damper to increase air flow through the kiln and opening the spy holes in the side of the ware chamber to allow air directly into the ware chamber without passing over the fuel, at the same time stoking with smaller amounts of wood. The temperature drops quite quickly to ~950C in 30 minutes at which time I consider the firing complete and shut all openings into the kiln. By late the next morning the kiln is cool enough to open and unpack.
